This task describes how to start a translation job on a structured document.
- Right-click the structured document and select .
You can select one or more structured documents for this translation job.
The
Start Translations For: dialog appears. The translation job is set up based on configuration settings in the
application document, particularly the choice of
Translation Package destination. See
Configuring Translation Options.
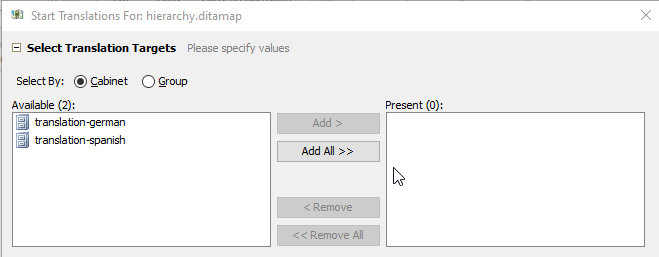
- In the Select Translation Targets area, specify the Select By option:
- Add one or more target language cabinets or groups to the Present pane as desired.
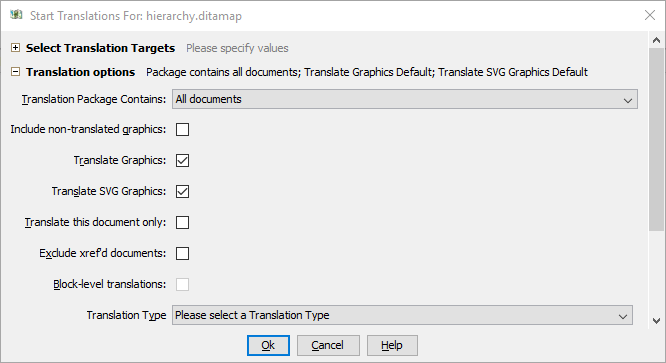
- Click
 next to Translation options.
The
Translation options fields appear.
- For Translation Package Contains, select from the list:
- Select or clear the Include non-translated graphics check box.
- If selected, graphics that are not translated are included in the translation package to assist translators in understanding the context.
- If cleared, non-translated documents are not included in the translation package.
Note: If a graphic is not translated, the translated document will reference the same graphic that the source document references.
- Select or clear the Translate Graphics check box to override the default value for translating graphics referenced by XML files.
The value of the
Translate Graphics check box initially displays the value of the
Graphic Translation Default from the
application document. See the
Graphic Translation Default check box entry in
Configuring Translation Options for more information on the behavior of
Translate Graphics.
Note: This field appears only if the application document's Allow submitter to Override Graphic Translation Default check box is selected.
- Select or clear the Translate SVG Graphics check box to override the default value for translating graphics referenced by SVG files that have been imported as structured documents.
Note: This field appears only if the application document's Allow submitter to Override SVG Graphic Translation Default check box is selected.
The value of the
Translate SVG Graphics check box initially displays the value of the
SVG Graphic Translation Default from the
application document. See the
SVG Graphic Translation Default check box entry in
Configuring Translation Options for more information on the behavior of
Translate SVG Graphics.
- Select or clear the Translate this document only check box.
- Select or clear the Exclude xref'd documents check box.
- Select or clear the Block-level translations check box.
- Select the Translation Type from the list.
- Select additional options appropriate for this translation job, if available.
If your system is configured to integrate with a translation management vendor, additional fields may appear when you click
next to
<Vendor> options. See these topics for further details:
- If desired, select Filtering options.
- To filter by date, in the By Date field select Extract by Date, then click in the Date field select a date and click OK.
- To filter by a snapshot label, in the By Date field select Snapshot Label, then in the Snapshot Label field, select a label or type one in.
- To filter using a filter file, select the By Attribute check box, then in the Filter field, select the desired filter.
The list contains only the filters that have been made available for the object selected for processing.
Note: This option is available only if
your system is configured to use filtering for
conditional processing. See
Configuring Filtering.
- If your system is configured to use Multiple Effectivities, select the By Attribute check box, then in the Conditions field click Add and specify XPath expression and values.
- If your system is configured to use Single Effectivity, select the By Attribute check box and move values from the Available column to the Present column.
- If desired, select Scheduling options.
- Click OK.
A Job_Translation job ticket is created. Users identified as translation managers in the Audience Parameter document receive an email notification. If you have selected multiple root maps for the translation job in Step 1 above, the notification email will list all structured documents you selected and also contain a target link.
A batch job creates a translation package, according to the options you selected and your system configuration, and routes the package to the destination specified in the Translation Package destination option in the application document. If errors occur during the translation workflow, translation managers receive email notification identifying the error.
 Note: Some fields are dependent on configuration settings. See Configuring Translation Options.