An administrator can create a user object to provide access to the repository to an end user and define how certain repository functions are implemented for the user.
A new user can also be created using the
Register New User option. See About the Register New User Option or by using the
createDBUsers.py script. See Creating or Modifying a User Definition Using a Script.
Note: Settings made for a
user here in the New
User dialog initialize fields in the User Properties
dialog for that user. These fields can be modified in the user's User Properties
dialog. See Modifying User Properties.
- Right-click the All Users group and select Administration > Create > New User.The New User dialog appears.
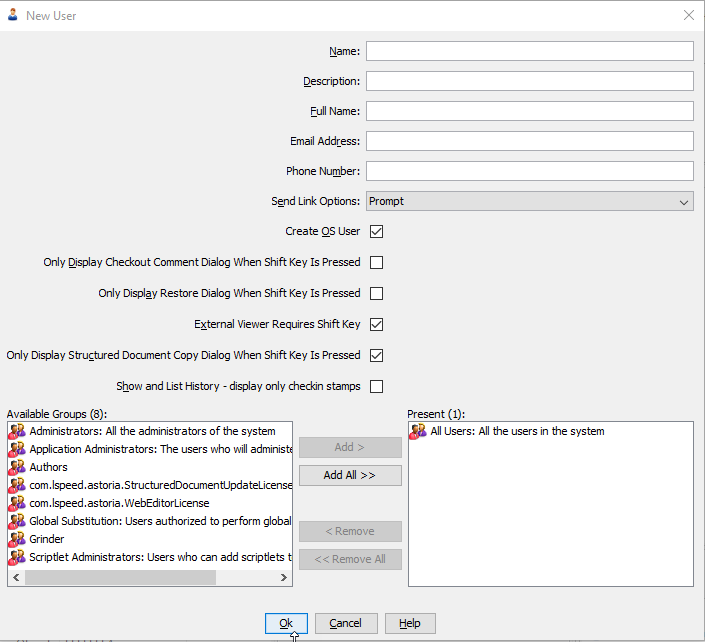
- Provide the following:
Property Description Name The name by which this user logs in. In some organizations, this is an employee number. Note: If your organization uses domain authentication, preface the user name with the domain name. For example, ASTORIA\john.smith. Astoria On Demand environments do not use domain authentication, so there is no domain name to specify.Description A description of this user. Full Name Identifies the full name of the user. Some organizations display this property in Astoria applications rather than the Name property. This would typically be the case if the Name property is an employee number. Email Address The email address of this user. This email is used for all Astoria notifications and other email functions. Phone Number The user's phone number. You can enter multiple phone numbers if needed. This information is strictly reference and is not used by Astoria features. Send Link Options Specify how to handle Location Link, View Link or GUID commands for repository objects: - Select Prompt to be prompted each time.
- Select Email to launch an email form with the link URL in the message.
- Select Clipboard to place the link URL on the user's clipboard.
Note: Selections made for this field also affect the Compose Mail command. See Sending Location, View, or Object Id Links.Create OS User If selected, also create a user on the operating system when creating this user. Note: Settings in the application document control the default value for this option, and whether or not it is visible or hidden. See About the Application DocumentAbout the Application Document.Only Display Checkout Comment Dialog When Shift Key Is Pressed Select the check box to require the user to press Shift to display the Checkout Comment dialog when this user edits a document. Only Display Restore Dialog When Shift Key Is Pressed Select the check box to require the user to press Shift to display the Restore dialog when restoring an object, or when the restore location must be specified. External Viewer Requires Shift Key Select the check box to require the user to press Shift when viewing an object to use an external viewer. An external viewer is a program running outside of the workbench, often the user's default web browser. If an external viewer is not being used, the Browse view displays the object.
Only Display Structured Document Copy Dialog When Shift Key Is Pressed Select the check box to require the user to press Shift to invoke the Structured Document Copy dialog when pasting a copied non-DITA structured document. See About Structured Document Copy Options for Non-DITA Structured Documents. Note: If the user clears the Only When Shift Key Pressed check box in the Structured Document Copy dialog, this User Properties check box is changed to reflect that selection.Show and List History - display only checkin stamps Some XML Editors allow a user to save a file, but not check it in yet. Select the check box to display only checkin version records. If the check box is cleared, users can see records showing when the file was saved but not checked in. Available Groups/Present By default, a user is added to the All Users group, which appears in the Present list. Select other groups as appropriate for this user from the Available list and add to the Present list. - Users who will edit documents using an XML integrated editor (such as the oXygen editor, XMetaL, or Arbortext Editor) must be added to the com.lspeed.astoria.StructuredDocumentUpdateLicense group.
- Users who will review and edit documents using the Oxygen WebApp editor must be added to the com.lspeed.astoria.WebEditorLicense group.
The number of users in the authoring license groups are limited to the number of licenses your organization has purchased. See Checking License Information .
Important: If you administer Astoria access controls, command visibility, or administrative object visibility by group membership, be sure you understand what privileges will be granted to this user by adding them to a group. - Click OK.
The new user object is saved in the repository and the end user can now log into the Workbench.