A system administrator manages filter constraints in the repository that define all of the allowed values that can be used in documents for a given filtering attribute, and can be used to create filter objects.
In a
FilterConfig.cfg file, constraints are grouped by attribute name and are bound to a set of DTDs.
A single table of filter constraints can be defined globally. These constraints are stored in the FilterConfig.cfg file located in the  Filtering folder in the Administration cabinet. These constraints are available to create a filter object.
Important: Filtering constraint files
that are located in project cabinets or folders or in release objects (that is,
not in the Filtering folder in the Administration
cabinet) will constrain the allowed values that can be used by users authoring
in the oXygen editor or in the Workbench Map Editor in documents in lower levels
of the repository hierarchy that inherit the values, but these constraints
cannot be used to create filter objects. Filter objects can be created and
stored only in the Administration cabinet's Filtering/Filters
folder, and can contain only filter attribute values that are defined in the
FilterConfig.cfg file located in the Administration
cabinet's Filtering folder.
- Select the scope level to specify where to execute the Manage Filter Constraints command.
| Option |
Description |
|---|
| global scope |
In the Administration cabinet, right-click the Filtering folder, then select . |
|---|
| cabinet, release object, or folder scope |
Right-click the cabinet, release object, or folder and select . |
|---|
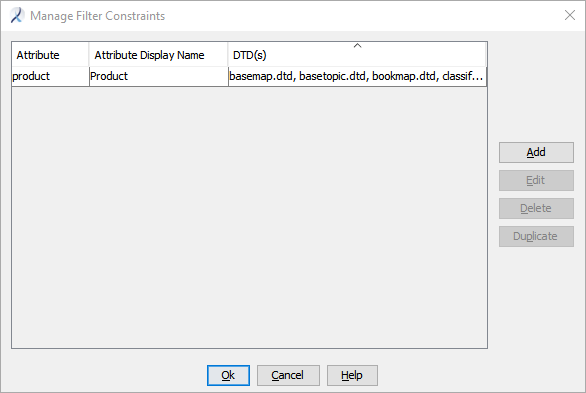
The
Manage Filter Constraints dialog appears.
If no constraints have been defined, the table is empty.
- To add a constraint, click Add.
Tip: You can select an existing row and click Duplicate to create a new row exactly like the selected row. This would be convenient if you want to use the same set of DTDs from an existing row, but then edit the row to provide a different attribute name.
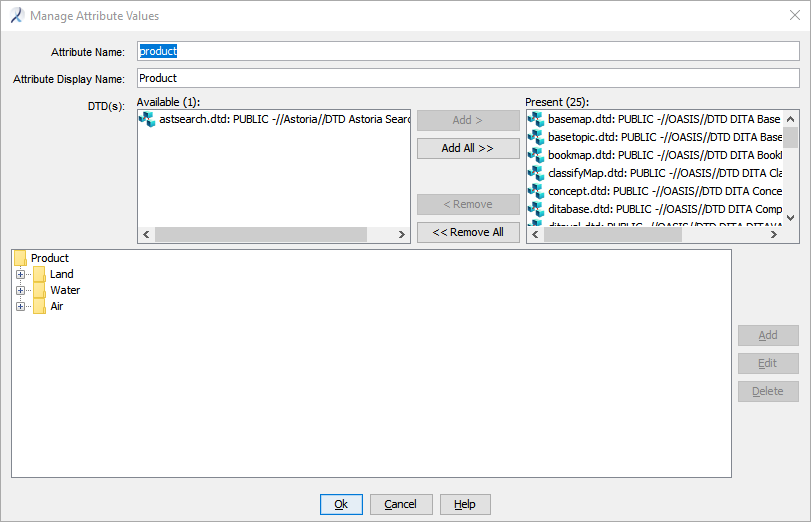
The
Manage Attribute Values dialog appears.
If attribute values have already been defined for the attribute, they appear in the lower box of the dialog in an expandable hierarchical structure (or in a single list if a hierarchy is not used for this attribute). If no attribute values have been defined, the box is empty.
- To create a new constraint, provide an Attribute Name and Attribute Display Name.
Note: The Attribute Name must be a valid attribute name for the DTD(s) you select next.
The
Attribute Display Name controls what appears in the lower box.
- Select the DTD(s) for this constraint to be applied to by adding them to the Present box from the Available box.
- Define a value to be allowed for this attribute by selecting the attribute name, then clicking Add.
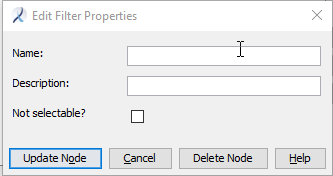
The
Edit Filter Properties dialog appears.
- Enter a Name and Description for the attribute value.
The Description text controls what appears in the Manage Attribute Values dialog.
- If the attribute name you entered is for a container in a hierarchical structure, and the container name is not an actual attribute value but is used only for organizational purposes as a container label, select the Not selectable? check box.
- Click Update Node.
The attribute value is added and the Manage Attribute Values dialog appears again.
- Add additional attribute values for the selected attribute name as desired.
You can create a hierarchy of attribute values by expanding the hierarchy for the attribute, and selecting an existing attribute value from the existing names and clicking Add. The attribute value is placed in that location in the hierarchy.
- Edit an existing attribute value by selecting an attribute name and clicking Edit.
Expand the hierarchy in the Manage Attribute Values dialog, select a value and click Edit. Change the values in the Edit Filter Properties dialog as appropriate.
- After defining all values for an attribute, click OK.
Astoria adds or modifies the attribute and its values, and the Manage Filter Constraints dialog appears.
- If needed, define additional attribute names and values.
Note: You can enter multiple rows for attributes with the same attribute Name, but different DTD or attribute values and descriptions. Use unique Attribute Display Name values to help you differentiate between the same attribute names with different constraint definitions.
- Click OK.
Astoria saves the changes in a
FilterConfig.cfg file. Global constraints are saved in the
Administration cabinet,
Filtering folder. Once a list of values is defined in this file, these values can be used to define filter objects and filter attribute values on documents using the oXygen editor or the Workbench Map Editor.
Cabinet, release object, or folder-level constraints are saved in a FilterConfig.cfg where you executed the command.