An administrator can import a DTD (Document Type Definition) into the repository from a local file system.
The simplest way to import a DTD into the repository is to select the name of a structured document on the local file system that uses the DTD, and issue the
Import DTD command on that file. Astoria will then automatically extract the required information
from the document's DOCTYPE statement and store it as a DTD in the repository.
Note: We recommend that the structured document and DTD both be located in the same folder on the local file system to ensure the import job can find the information needed to import the DTD.
- Navigate to the repository folder location where you want the DTD to be stored.
If necessary, create a new subfolder for the imported DTDs. Authorized users can create subfolders in the Administration cabinet. You can store imported DTDs in a new subfolder in the
DTDs folder in the
Administration cabinet, or in a folder in a data cabinet.
Note: Any folder where you store DTDs should have a presentation that includes these columns:
- Document Types
- Item Flavor
- Right-click the folder and select .
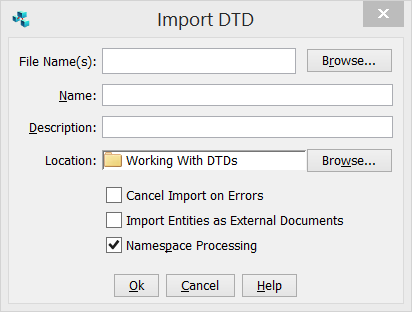
The
Import DTD dialog appears.
- Click Browse, then in the Select Declaration Document dialog, navigate to and select the name of a structured document in the file system that is based on the DTD you want to import.
Tip: In the dialog's Files of type field, select Declaration Files to display only files that are based on DTDs.
- Click Select.
The Import DTD dialog appears again, with the File Name you selected displayed.
- In the Name field, replace the file name with the correct name of the DTD.
For example, for a DITA concept, the name would be concept.dtd.
- Specify additional options as appropriate:
| Option |
Description |
|---|
| Description |
An optional description of the file. |
| Location |
Specifies the location of the DTD. If needed, navigate to and select a different repository location. |
| Cancel Import on Errors |
If the check box is selected, if any validation errors occur, the file is not imported. |
| Import Entities as External Documents |
We recommend that you clear the check box. |
| Namespace Processing |
If the check box is selected, namespace processing validation is performed. |
- Click OK.
The DTD is imported into the selected folder.
- For imported DITA DTDs (either maps or topics), specify the Document Types custom attributes:
Note: Skip this step if the imported DTD is not a DITA DTD.
- Right-click the DTD file and select .
- In the DTD Properties dialog, select the Custom Attributes tab.
- Click Add, and from the Choose Custom Attributes list, select Document Types and click OK.
- Move the appropriate document type from the Available area to the Present area.
- Move DITA to the Present area for a DITA topic DTD.
- Move DITAMAP to the Present area for a DITA map or bookmap DTD.
- Click OK.
- For imported non-DITA DTDs, optionally define the Locking Unit Elements custom attributes:
Note: Structured documents using DITA DTDs typically use a single locking unit per document, so for imported DITA DTDs, skip this step.
- Right-click the DTD file and select .
- In the DTD Properties dialog, select the Custom Attributes tab.
- Click Add, and from the Choose Custom Attributes list, select Locking Unit Elements and click OK.
- In the text field, enter an element name or a comma-separated list of the elements in the DTD that are locking unit boundaries.
- Click OK.
The imported DTD is ready to be used for repository documents.
DITA DTDs (except for DITAVAL) should display a Document Type of either DITA or DITAMAP. In addition, all maps should display an item flavor starting with dita_map_. The ending will be map, bookmap, or something else if it is a specialized map DTD.