After editing an object, authoring users can change the workflow status of an object when checking it in to the repository to move it through workflow.
The workflow status can be changed when checking in a structured document, an unstructured file, or when checking in a replacement file. See
About Checking In Objects.
- Start the checkin process using any of the available methods for the object.
The
Checkin or
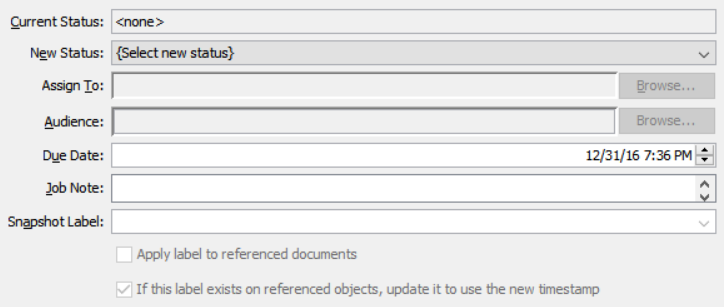
Close dialog contains fields that support changing the workflow status:
The Current Status field identifies the status of the object. If it shows <none>, the object is not yet in a workflow.
The work-flow-related fields in the dialog will vary, depending on how the workflow is configured. Make selections in these fields, as appropriate for the workflow configuration. If you are not using workflow on the object, leave these fields blank.
- Select a New Status.
The available states are defined in one or
more Task Sequence documents inherited by the object.
- Make selections in the Assign to or Audience fields, as appropriate for the workflow configuration.
These fields are enabled only if the Task Sequence document
Status changer chooses audience option is selected.
- The Assign To field is enabled if the transition specifies a Task Owner.
- The Audience field is enabled if the transition specifies a Task Audience.
- Both fields are enabled for a parallel workflow.
- Accept the default Due Date for the next job step, or change it to a new date and time.
- If desired, enter a Job Note that will be included in the job ticket comment field.
- Enter a Snapshot Label or select one from the list.
Settings in the Task Sequence document control whether this field is enabled and if so, how this field is used.
- If you are applying a Snapshot to a document that references other documents, select the Apply label to referenced documents check box.
If the check box is cleared, the snapshot label will be applied only to the object.
- If you are applying a Snapshot to a document that references other documents, select the If this label exists on referenced objects, update it to use the new timestamp check box.
If the check box is cleared, all referenced objects that already have this snapshot label will not have the timestamp modified with that of the selected object. However, the selected object will have the timestamp changed to the date specified here.
- Click Ok.
- If your organization requires electronic signatures for snapshot labels or for changing a status, you are prompted for your credentials. You must enter the same credentials that were used to log into Astoria, then click OK.
The object is saved and checked in to the repository. If you are using workflow:
The object advances to the new status.
Any existing jobs associated with the object are deleted.
A new job is created that references the object.
The job is assigned to the Task Owner or posted to the Task Audience.
If you have changed status on a map, topics
referenced by that map may have their status changed as well. See Setting Workflow Status on Documents Referenced by a Map.